ppt-bird

  • Subscribe to our RSS feed.
  • Twitter
  • StumbleUpon
  • Reddit
  • Facebook
  • Digg

Tuesday, 22 March 2011

How to Add Music to PowerPoint 2007 and Playing Across Slides

Posted on 21:11 by Unknown
Many people asked the question on how to add music to PowerPoint 2007 and at the same time the music can play across the entire PowerPoint slides.

To add music to PowerPoint 2007 is quite easy, I think almost all of us know how. And to make it play repeatedly, all we need to do is to make a few further settings.

For most of the tutorials are about PowerPoint 2003, I will tell you how to make it in PowerPoint 2007, which is a little different, from the very beginning.

Step 1: Insert the music to your PowerPoint
From the toolbar, “Insert” > “Sound” > “Sound from File”
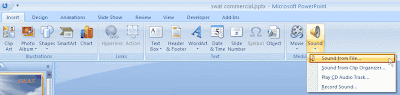


Music Play Across in PowerPoint 2007


Then in the popup window, choose a song and click “OK”
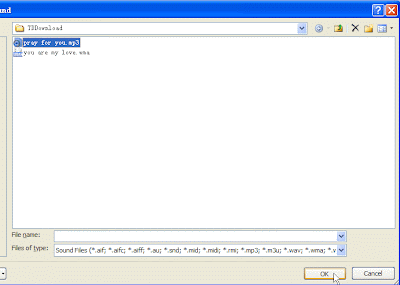


Music Play Across in PowerPoint 2007


You will then get a message about how do you want the music to start in the slide show.
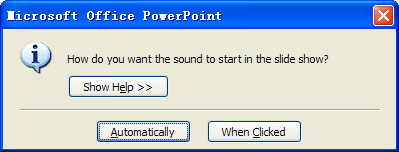


Music Play Across in PowerPoint 2007


Step 2: (The main part) Settings to make the music play across the slides
“Animation” on the toolbar > “Custom Animation” > Right click on the music and select “Effect Options”
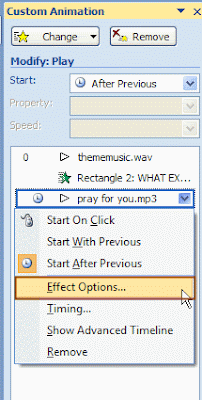


Music Play Across in PowerPoint 2007


You will need to set when the music stops in “Stop Playing” > “After number slides”, set the number as the last slide to enable the music to play across the whole PPT.
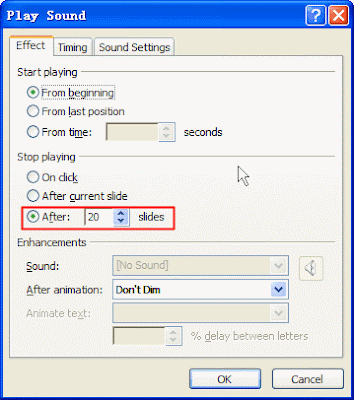


Music Play Across in PowerPoint 2007


Step 3: Finally, embed the music into the PowerPoint 2007
You need to enlarge the file size setting of PowerPoint 2007, click the round Office button > “PowerPoint Options” > choose “Advanced” in the pop up window > find the “Save” option on the right > set the max file size in “Link sounds with greater file size than” box, the number should be bigger than the file size of the music.
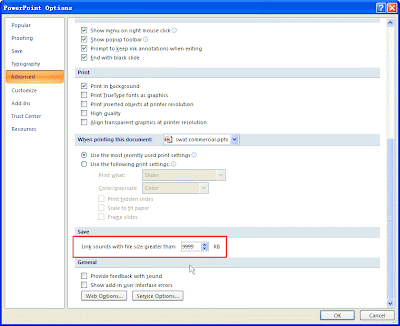


Music Play Across in PowerPoint 2007


The only thing is that the file size of the final PPT file could be quite large.

More PowerPoint tips and knowledge

Download Free PowerPoint Templates Download Free PowerPoint Templates
Read More
Posted in PowerPoint Tips | No comments

Monday, 21 March 2011

How to Reverse Text in PowerPoint

Posted on 20:19 by Unknown
Question: How to reverse text in PowerPoint?
For some instances, we may want to put a line of text upside down or vertical. Actually it is a quite useful skill to make the PowerPoint more flexible and appealing. How to make it? Please follow me.

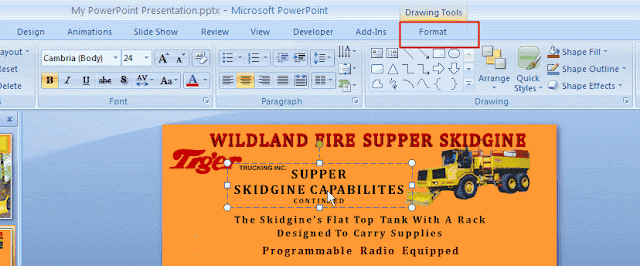
Step 1: After open your PPT file, select the line you want to reverse, and there will come up "Format" option on the toolbar.


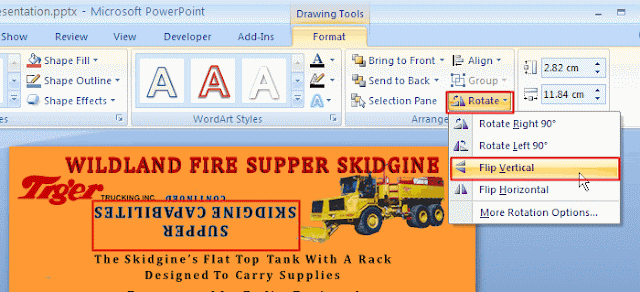
Step 2: Click "Format", find the "Rotate" below, click it, there are five options, choose "Flip Vertical" for example, you will see the line as the picture shows below.


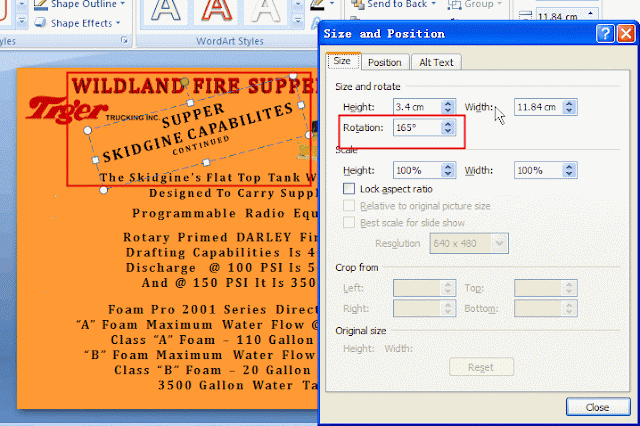
Step 3: Click "More Rotation Options" to make advanced adjustment. For example, set the "Rotation" as "165°", the text will show as follows.


Have a try and make a wonderful PPT by yourself.
Read More
Posted in PowerPoint Tips | No comments

How to Add Bookmarks in PowerPoint 2007

Posted on 00:31 by Unknown
PowerPoint is widely used in our daily life, whether you are trying to make a presentation in class, give a speech to public, or introduce our products in business affairs, you will use it. Someone suggest a good PowerPoint contains no more than 10 slides. But most of the time, a PowerPoint may contain 10 to 20 slides and several chapters. It is a good way to create a menu to organize it and build a shortcut to each chapter or return to the main menu.

Adding bookmarks in PowerPoint makes it possible. Here takes PowerPoint 2007 as an example to show how to do that. The basic idea is to create hyperlinks between the slides.

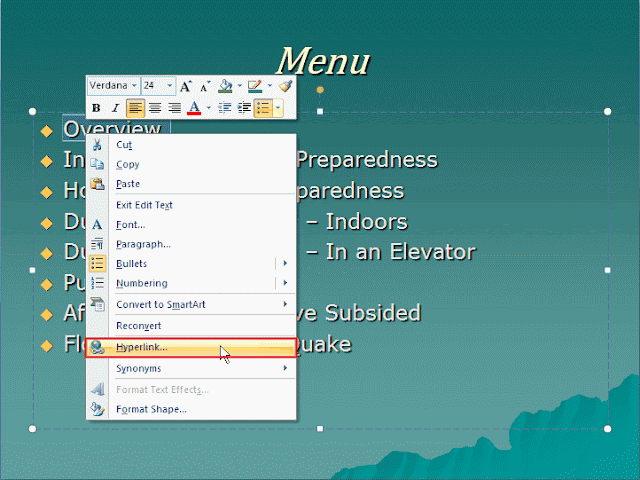
Step 1: After creating the menu for your PowerPoint, select the sub-title, right click, choose "Hyperlink"


Add Bookmarks in PowerPoint 2007

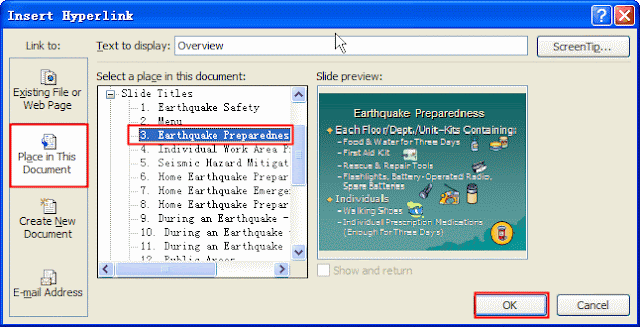
Step 2: In the pop up window, choose "Place in This Document", and there will be the list of all the slides on the right, select the one you want to link to and press "OK".

Add Bookmarks in PowerPoint 2007

Step 3: Create a shortcut back to main menu.

Repeat the steps talked above, you can make a great bookmark in PowerPoint 2007.
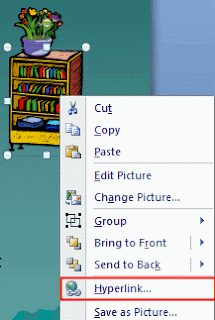
If you prefer graphical hyperlinks, you may put a bookmark on an image. First insert an image and then right click on the image and choose "Hyperlink" in the same way as for text above.

Add Bookmarks in PowerPoint 2007

Easy, isn't it? Don' t hesitate, make one for yourself!
Read More
Posted in PowerPoint Tips | No comments

Friday, 18 March 2011

How to Make Your Resume Looks Good

Posted on 01:27 by Unknown
When you are finding a job, the resume is the first thing the employer can get to know you. Basically, a resume is a brief overview of your experience and skills putting together to sell yourself as one of the best choices for a prospective employer to interview. It initiates the process of introducing yourself to the employer. So the quality of your resume determines the whole job hunting process. Some may say the most important is that you have the true knowledge and ability to do the job well, which unfortunately cannot be judged unless you have got that job.
The content is the most important of your resume, but it doesn’t mean the more you write the better your resume will be. I recommend the resume to be no more than 2 pages. Basically, your resume should include the following information.


(1) First of all, you need to put your complete contact information on top. That includes: full name, full address, phone number, and E-mail.

(2) Open your resume with your education. Include all the schools that you have attended and your GPA. Do not put anything below middle high-school.

(3) After education, list all your previous job experiences and the volunteer experience that you had and any special awards or honor rolls. This is the most important part of your resume. If you have much experience, remember to keep it concise if you want to list them all. Or you can pick a few and illustrate them in some detail.

Another thing to bear in mind is to make it easy to read. You should choose the right background color, font and page structure. Take a reference of the successful resume samples on the Internet will help you a lot. One thing you should not forget is to make it look good after printed on papers.

Usually the resume is created in Word, Excel, or Photoshop. It is fine if you make it in Photoshop, for the resume is saved as an image, and it will look quite nice after printing. For those who make resume in Word or Excel, I suggest you save it as a PDF file, for one thing you never know what version of word or Excel processor your recipient is using. For another, a PDF file will look much better than Word or Excel after printing.

That’s it. As long as your resume is informational and looks good, it will absolutely impress the employer and more job opportunities will come to you.
Read More
Posted in PowerPoint Tips | No comments

Thursday, 17 March 2011

Free PowerPoint Templates for St Patrick's Day

Posted on 01:04 by Unknown


Read More
Posted in PowerPoint Templates | No comments

Wednesday, 16 March 2011

What Should We Learn From the Japan Earthquake – Preparedness

Posted on 01:32 by Unknown
A massive 9.0 magnitude earthquake hit the Pacific Ocean nearby Northeastern Japan, 130 km from Tokyo, at around 2:46pm on March 11 causing huge damage with blackouts, fire and tsunami and even the nuclear leak in Fukushima.

We all know Japan is a country confronts lots of earthquakes, volcanoes, tsunamis for its unique geological location. Ever since the Great Hanshin Earthquake which happened in January 1995 in Kobe city, killed 6,000 and injured 415,000 people, the Japanese government has made great efforts to educate the whole nation about how to survive in an earthquake and improve the infrastructure, such as the quality of the buildings, the prediction and alert system of earthquakes.

These efforts finally pay off. We can see how the Japanese unify to pass through this disaster with great discipline. Also much fewer victims than Sichuan Earthquake in 2008 has been reported even though the 1 million Sendai city is right on the corner of the epicenter.

If people can make enough preparation in our daily life and education system before earthquake happens, much more lives can be saved. There are many such information on the Internet, in various forms, while the PowerPoint may be the most informational and easy making. But it is not convenient to view PowerPoint, for a computer or Internet is needed. If the PowerPoint can be burnt to DVD discs, people can watch it and learn the basic survival tips anytime anywhere, all the need are DVD player and TV, which is quite common used. How nice will it be!

To burn PowerPoint to DVD is not difficult indeed. Let’s take a look at how to do it.

Step 1: Import the PowerPoint file
After launch Moyea PPT to DVD Burner, click "Add" button on the left to add PowerPoint file to the program.

Burn PPT to DVD-1

Step 2: Output Video Options
Click "Next" to the output video options interface. "Norm" refers to the TV standard for your DVD output. Generally, NTSC applies to American users while PAL applies to European users. If you are not sure which one it should be, click "Help" to check it.

Burn PPT to DVD-2

Click "Advanced Settings" to further adjust the "Slide Size", "video Layout", "video Quality", and conversion status for your DVD output, if necessary.

Burn PPT to DVD-3

Step 3: Choose a right DVD menu or create your own
Choose the preset menu style or create a new menu by click "Menu Design".

Burn PPT to DVD-4

In the pop up window, click each specific tab in the frame to make a change like background fill, button styles, icon styles and frame colors.

Burn PPT to DVD-5

Step 4: Add background music
The Music feature gives you an alternative to sound inserting in PowerPoint. Click "Add Music" to add a favorite song as the background music.

Burn PPT to DVD-6

Step 5: Burn PPT to DVD
Click "Start" button to enjoy the super conversion of PPT to DVD.

Burn PPT to DVD-7

After burning PowerPoint to DVD, people can sit back toward a TV, and watch the PowerPoint-made DVD with their families and friends easily. With more earthquake knowledge and sufficient preparedness, there will be fewer casualties in the earthquake disaster.
Read More
Posted in PowerPoint Tips | No comments

Tuesday, 15 March 2011

How to Embed a Video into PowerPoint 2007

Posted on 04:04 by Unknown
Summary: 2 easy ways to insert video (movie) into PowerPoint 2007, play video in PowerPoint 2007.

With video inserted into PowerPoint can surely add attraction to PowerPoint presentation.

In this article, I will introduce two methods on "How to insert a video into PowerPoint 2007".

Method 1: Direct insertion

Step 1: On the "Insert" tab, point to "Movies", and then click "Movie from File".

Embed Video into PowerPoint 2007

Step 2: Click the video you want to use and then click "OK".

Step 3: After you click OK, you' are promoted with a message asking how you want the movie to start in the slide show. I recommend you choosing "Automatically "even if you want the movie to play when clicked. And that's done.

Tips:
1. This is the easiest way to insert a video.
2. When playing the video that is inserted in this way in the PowerPoint, it only shows the video thumbnail, and only has two control options: play or stop. So you can't select the playing time freely.
3. Only video in formats of AVI, MPEG and WMV can be inserted in this way.
4. Always put the movie in the same folder as your PowerPoint presentation.If you later move the PowerPoint presentation to another computer, copy the movie too. Keeping your movie in the same folder as your presentation ensures the link will still work. However, you should always test the movie on a new machine just to be certain. Re-insert the movie, if necessary.

Method 2: Windows Media Player Insertion

If you want to view the video in PowerPoint just like viewing in Windows media player, you can try this insertion method.

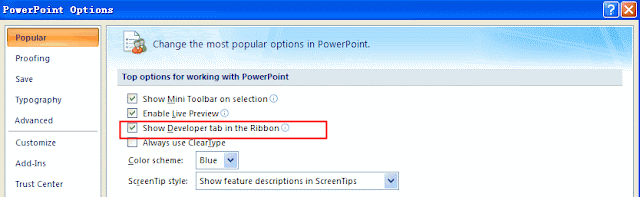
Step 1: Enable control. Because the default state in PowerPoint 2007, control function is hidden, we need to enable it firstly as follows:
1. Left click" office button" in PowerPoint 2007
2. Hit" PowerPoint options" to open it
3. In the open box, select" Popular" tab, check the option that "Show developer tab in the ribbon", at last click" OK".
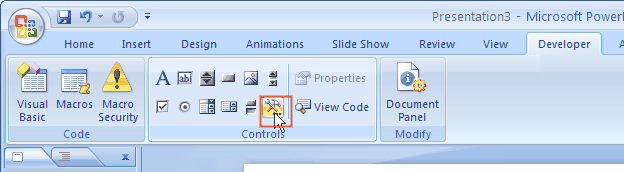
Return to the PowerPoint edition interface, there will be a new option-"developer" on the toolbar.

Embed Video into PowerPoint 2007

Step 2: Insert videos.
1. Click" developer" button to enter its menu layout
2. Select" More controls" button in " control" area, there will pop up a dialogue box

Embed Video into PowerPoint 2007

3. In the dialogue box, select" Windows Media Player", click" OK" to close the dialogue box. Then the mouse will become"+".
4. Drag the mouse, the player interface of Windows Media Player will appear in the PPT.
5. Select the player interface, right click, select" properties", a dialogue box will pop up.
6. Input the path and name of video file in" URL" option.
An example of a file name is as follows:
C\:My video.avi
7. Close" properties" window, and you have inserted the videos successfully.

Tips:
1.This methods needs more options to insert a video.
2.When playing the video that is inserted in this way in the PowerPoint,it is actually playing in Windows Media Player,thus full control options are available: play, pause, volume or stop. So you can select the playing time freely.
Read More
Posted in PowerPoint Tips | No comments
Newer Posts Older Posts Home
Subscribe to: Posts (Atom)

Popular Posts

  • How to Use Different themes in One PowerPoint File
    Usually when we create a PowerPoint slideshow, we would use a certain PowerPoint theme. We can get it by creating by ourselves, choose from ...
  • Earth Day 2012 PowerPoint Background Free Download
    Earth Day 2012 is coming in two days. This is the first Earth Day that I really pay some attention to. I know every April 22 is the annual...
  • Best Portable Devices of 2011
    The year 2011 has become a history but absolutely not the technical gadgets (Smartphones & Tablets) that hit the market. Here is a list ...
  • The new iPad Unboxed: What does it Look Like?
    On March 7 we finally get to know that the next generation iPad is neither iPad 3 nor iPad HD , but simply “ the new iPad ”. It seems tha...
  • How to Mute Video in a PowerPoint Presentation
    Really strange question, huh? Mostly people will ask you how to keep the sound in PowerPoint when playing on another computer or something...
  • 8 Online Applications to Save PDF as Word You Should Add to Your Favorites
    PDF has its advantage as a popular document file. As I know, many eBooks, contact, order and many other files are saved as PDF for various r...
  • Tutorial of Converting PPTX to MP4 Video with Professional PPTX to MP4 Converter
    How to convert PPTX to MP4 with this professional Moyea PPTX to MP4 Converter ? The following will show you the step by step guide on conver...
  • How to Add Captions to Photo Album in PowerPoint 2010
    If you have made a Christmas Photo slideshow using PowerPoint 2010 before, you should have noticed that although it is perfect to see each p...
  • How to Add Music to PowerPoint 2007 and Playing Across Slides
    Many people asked the question on how to add music to PowerPoint 2007 and at the same time the music can play across the entire PowerPoint s...
  • Three Spotlights of iPad 2
    Apple Inc. is expected to release iPad 2, its second generation iPad on March 2, and the CEO Steve Jobs may appear on the press conference s...

Categories

  • Back to School
  • Famous Quotes
  • Free Resources
  • Halloween
  • Holiday
  • iPhone 5
  • London Olympics
  • Moive Review
  • News
  • Others
  • photo slideshow maker
  • PowerPoint
  • PowerPoint background
  • PowerPoint Background Music
  • PowerPoint Templates
  • PowerPoint Tips
  • PPT Tool
  • Smartphone/Tablet
  • The Twilight Saga: Breaking Dawn Part 1
  • Wallpaper
  • Wallpapers
  • YouTube

Blog Archive

  • ▼  2013 (5)
    • ▼  April (2)
      • 5 PowerPoint Alternatives for Making Presentations...
      • How to View PowerPoint on Sony Xperia ZL?
    • ►  March (2)
    • ►  February (1)
  • ►  2012 (109)
    • ►  November (2)
    • ►  October (8)
    • ►  September (6)
    • ►  August (13)
    • ►  July (13)
    • ►  June (12)
    • ►  May (12)
    • ►  April (11)
    • ►  March (12)
    • ►  February (12)
    • ►  January (8)
  • ►  2011 (179)
    • ►  December (16)
    • ►  November (18)
    • ►  October (17)
    • ►  September (17)
    • ►  August (29)
    • ►  July (19)
    • ►  June (20)
    • ►  May (15)
    • ►  April (7)
    • ►  March (19)
    • ►  February (2)
Powered by Blogger.

About Me

Unknown
View my complete profile